Preparation

Proper preparation is crucial for a successful paint job on your wood cabinets, ensuring a smooth, durable, and long-lasting finish. A well-prepared surface allows the paint to adhere properly, preventing peeling, chipping, and other issues.
Materials and Tools
Before starting, gather the necessary materials and tools to ensure a smooth and efficient painting process.
- Paint: Choose a high-quality black paint specifically designed for cabinets. Consider factors like sheen, durability, and ease of application. For example, semi-gloss black paint is a popular choice for cabinets due to its durability and easy cleaning.
- Primer: A primer is essential for creating a smooth, even surface for the paint to adhere to. Choose a primer compatible with your paint and wood type. For instance, an oil-based primer is generally recommended for wood cabinets.
- Sandpaper: Sandpaper is used to smooth out imperfections and create a uniform surface for painting. Use a variety of grits, starting with a coarser grit (like 80 grit) for rough sanding and progressing to a finer grit (like 220 grit) for finishing.
- Brushes and Rollers: Select brushes and rollers appropriate for the size and shape of your cabinets. For example, a 2-inch angled brush is ideal for detailed areas, while a 9-inch roller is suitable for larger surfaces.
- Drop cloths: Protect your floors and surrounding areas from paint spills and splatters by using drop cloths.
- Cleaning supplies: You’ll need cleaning supplies to remove dirt, grease, and grime from the cabinets before painting. These include a cleaning solution (like TSP, trisodium phosphate), rags, and a bucket of water.
Surface Preparation
Thorough surface preparation is essential for a professional-looking finish.
- Clean the cabinets: Remove dust, dirt, grease, and grime from the cabinets using a cleaning solution like TSP. For example, mix a solution of 1/2 cup TSP with 1 gallon of warm water. Apply the solution to the cabinets with a damp cloth, scrub gently, and rinse thoroughly with clean water. Allow the cabinets to dry completely.
- Sand the cabinets: Sand the cabinets with sandpaper to smooth out any imperfections and create a uniform surface for painting. Start with a coarser grit (like 80 grit) for rough sanding and progress to a finer grit (like 220 grit) for finishing. For example, sand the entire surface of the cabinets with 80-grit sandpaper, then switch to 120-grit, and finally finish with 220-grit sandpaper.
- Fill any holes or imperfections: Use wood filler to fill any holes, cracks, or imperfections in the wood. Apply the wood filler according to the manufacturer’s instructions, let it dry completely, and then sand it smooth. For example, apply wood filler to any holes or cracks using a putty knife, let it dry for 24 hours, and then sand it smooth with 120-grit sandpaper.
Step-by-Step Guide for Preparing Wood Cabinets for Painting
Follow these steps for thorough preparation:
- Remove cabinet doors and hardware: Remove all cabinet doors and hardware, such as hinges, knobs, and pulls, to ensure a smooth painting process.
- Clean the cabinets: Thoroughly clean the cabinets with a cleaning solution like TSP to remove any dirt, grease, or grime. For example, mix a solution of 1/2 cup TSP with 1 gallon of warm water. Apply the solution to the cabinets with a damp cloth, scrub gently, and rinse thoroughly with clean water. Allow the cabinets to dry completely.
- Sand the cabinets: Sand the cabinets with sandpaper to smooth out any imperfections and create a uniform surface for painting. Start with a coarser grit (like 80 grit) for rough sanding and progress to a finer grit (like 220 grit) for finishing. For example, sand the entire surface of the cabinets with 80-grit sandpaper, then switch to 120-grit, and finally finish with 220-grit sandpaper.
- Prime the cabinets: Apply a primer to the cabinets to create a smooth, even surface for the paint to adhere to. Choose a primer compatible with your paint and wood type. For instance, an oil-based primer is generally recommended for wood cabinets. Use a brush or roller to apply the primer evenly, following the manufacturer’s instructions.
- Allow the primer to dry: Let the primer dry completely before proceeding to the next step. Drying time will vary depending on the primer and environmental conditions. Refer to the manufacturer’s instructions for specific drying times.
Painting Techniques

The way you apply paint to your cabinets can significantly impact the final look. There are several methods, each with its pros and cons. Let’s explore the popular options and their nuances.
Brush Painting
This is a classic approach that offers good control and precision. It’s especially useful for reaching tight corners and intricate details. However, brush strokes can be visible, especially on large surfaces.
Tips for Achieving a Smooth Finish
- Use a high-quality brush with soft bristles. This will help minimize brush strokes and ensure a smooth application.
- Load the brush with a moderate amount of paint. Too much paint will lead to drips, while too little will result in streaks.
- Apply paint in thin, even strokes. Overlapping the strokes slightly helps create a smooth finish.
- Work in small sections, allowing each section to dry before moving on.
- Use a brush specifically designed for oil-based or water-based paints, depending on your chosen paint type.
Rolling
Rolling is a faster method for covering large surfaces. It’s particularly suitable for cabinet doors and flat areas. However, rolling can be tricky around corners and edges.
Tips for Achieving a Smooth Finish
- Use a roller with a nap suitable for your paint type. A shorter nap is ideal for smoother surfaces, while a longer nap is better for textured surfaces.
- Load the roller with a moderate amount of paint. Too much paint will cause drips, while too little will result in streaks.
- Roll in a smooth, even motion, overlapping each stroke by about half the roller width.
- Avoid applying too much pressure, as this can cause paint to build up and leave streaks.
- Use a roller cover specifically designed for oil-based or water-based paints, depending on your chosen paint type.
Spraying, How to paint wood cabinets black
Spraying is the fastest and most efficient method, providing a smooth, even finish. However, it requires a spray gun and proper ventilation.
Tips for Achieving a Smooth Finish
- Use a spray gun designed for the type of paint you’re using. A HVLP (High Volume Low Pressure) spray gun is ideal for most projects.
- Practice spraying on a scrap piece of wood before applying paint to your cabinets.
- Hold the spray gun about 6-8 inches away from the surface and move it in a smooth, even motion.
- Apply thin coats of paint, allowing each coat to dry completely before applying the next.
- Use a respirator mask and protective eyewear when spraying paint.
- Ensure adequate ventilation to prevent paint fumes from accumulating.
Applying Paint in Thin Coats
- Regardless of the painting method you choose, it’s crucial to apply paint in thin coats.
- Thin coats allow the paint to dry evenly and prevent drips and runs.
- Apply one thin coat, allowing it to dry completely before applying the next.
- Two or three thin coats are typically enough for a smooth, even finish.
Using Painter’s Tape
- Painter’s tape is a valuable tool for creating clean lines and protecting surrounding areas from paint splatters.
- Apply painter’s tape to the edges of the cabinet doors, drawers, and surrounding surfaces before painting.
- Press down firmly on the tape to ensure a good seal.
- Remove the tape while the paint is still wet to avoid peeling off the paint.
Finishing Touches: How To Paint Wood Cabinets Black

Applying a sealant or topcoat to your freshly painted cabinets is a crucial step in the process. This final touch protects your hard work, enhances the look of the finish, and ensures your cabinets remain beautiful for years to come.
Types of Sealants
The type of sealant you choose will depend on your desired finish and level of protection.
- Clear Sealants: These sealants provide a protective layer without altering the color of the paint. They are ideal for preserving the true black hue of your cabinets.
- Satin Sealants: Offering a slightly sheen finish, satin sealants provide a balance between gloss and matte, creating a soft, sophisticated look.
- Gloss Sealants: Gloss sealants provide a high-shine finish, making them suitable for those seeking a more dramatic and reflective look.
Applying Sealant
- Prepare the Surface: Before applying sealant, ensure your painted cabinets are completely dry. Wipe down the surface with a damp cloth to remove any dust or debris.
- Choose Your Application Method: Sealants can be applied using a brush, roller, or spray gun. The best method depends on the size of your cabinets and your personal preference.
- Apply Thin, Even Coats: Apply the sealant in thin, even coats, avoiding drips or runs. For optimal results, allow each coat to dry completely before applying the next.
- Dry Time: The drying time for sealant will vary depending on the type and brand. Check the manufacturer’s instructions for specific drying times.
Sealant Options
| Sealant Type | Benefits | Drawbacks |
|---|---|---|
| Clear Sealant | Preserves the true color of the paint, provides a protective layer. | May not be as durable as other options. |
| Satin Sealant | Offers a balanced sheen, provides a sophisticated look, durable. | May not be as easy to clean as gloss finishes. |
| Gloss Sealant | Provides a high-shine finish, easy to clean, durable. | Can highlight imperfections in the paint. |
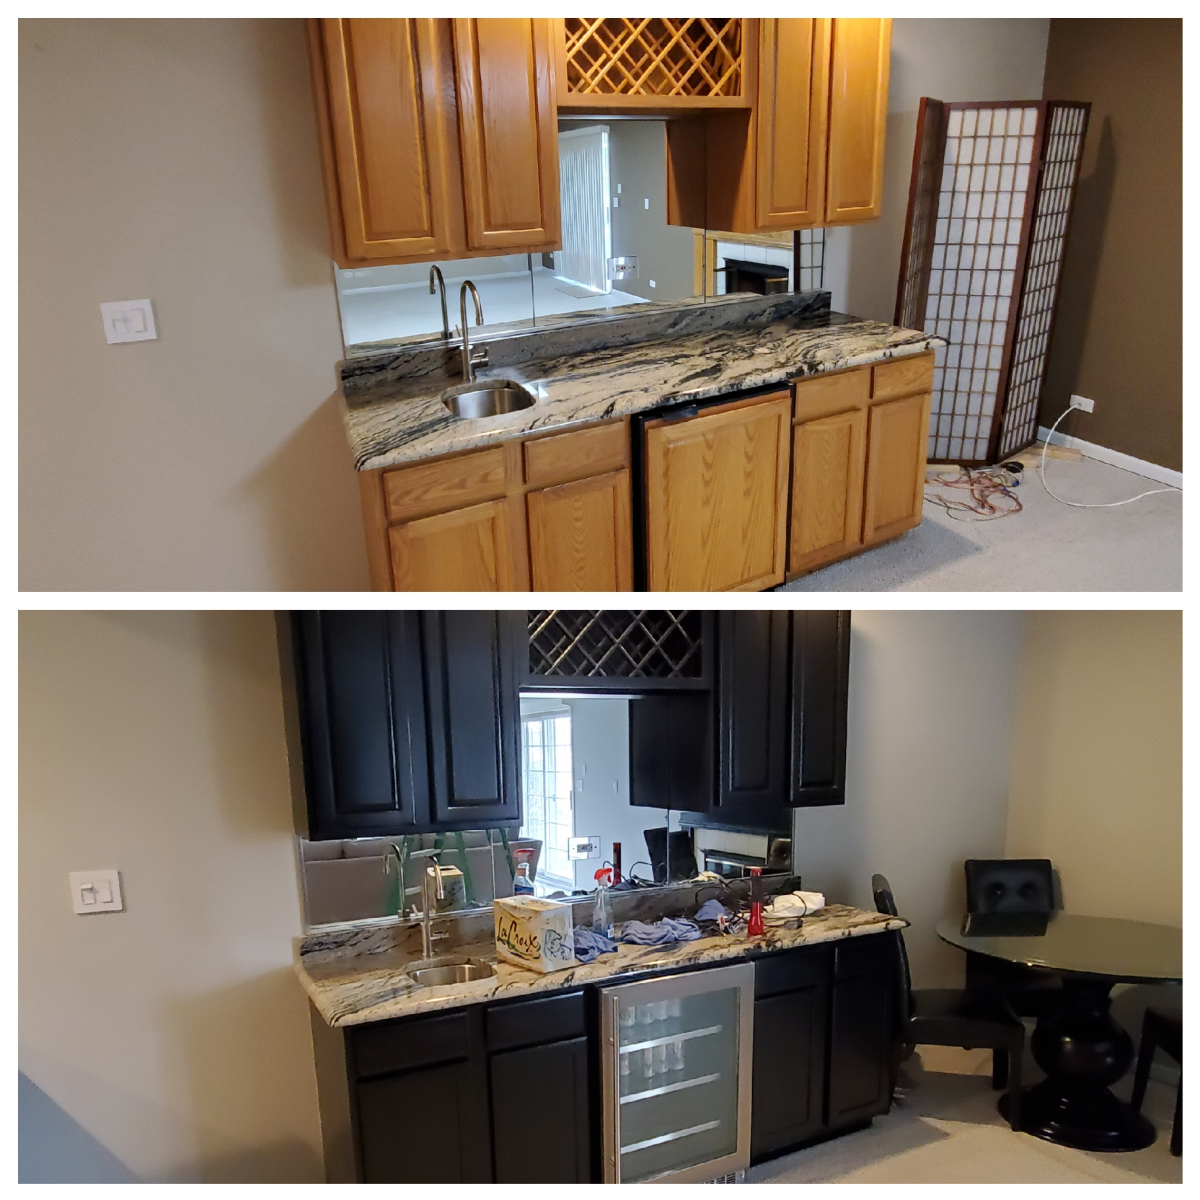
How to paint wood cabinets black – Painting wood cabinets black can be a transformative project, adding a touch of sophistication to your kitchen. If you’re considering a move to a new space, perhaps you’d be interested in finding 2 bedroom apartments in Brandon, FL , where you can showcase your newly painted cabinets in a fresh, stylish setting.
Once you’ve found your dream apartment, you can get started on your cabinet makeover, transforming your kitchen into a modern oasis.
Painting wood cabinets black can dramatically transform a kitchen, creating a sleek and modern look. If you’re looking for a fresh start in a new space, consider exploring the charming city of Tuscaloosa, where you can find a wide variety of 2 bedroom apartments in Tuscaloosa.
Once you’ve settled in, you can unleash your creativity and paint those cabinets black, adding a touch of sophistication to your new home.
